This guide will demonstrate how to set up SMS sharing via Foto Master Photo Booth using Twilio and your own Web Server.
Prerequisites:
- Your own domain name and web server
- Basic knowledge of website administration
- Access via FTP
- Twilio Account: http://twilio.com
- Backup any data that could be lost if the steps taken in this manual are not followed correctly
Third Party Apps used:
Step 1: Sign up for Twilio at http://twilio.com using your business details. Select that you will use the service for SMS.
Step 2: Top up your account with credit - $20 is the recommended amount for setup and testing.
Step 3: Purchase a UK phone number, you can automatically generate one or define a specific number. Please note the number must be unique and not already in use. On the Twilio control panel – click the ‘Buy a Number’ link from the dashboard

Step 4: Once you’ve created a number, make note of this number including the country code as we will need this later to set up inside of Mirror Me Booth.

Step 5: Once you’ve created your telephone number and have money on your account you can then access your project info from the dashboard of Twilio.
Your account SID and Auth token should remain secure – do not share these details with anyone.
Take note of the SID and Auth token as we will need to use these later to set up inside of Mirror Me Booth.

Step 6: Download the PHP script from here
Once downloaded, extract them to a folder named ‘SMS’ – this is the folder we will upload to your web server shortly.
Step 7: Open the ‘SMS’ folder and edit the PHP script. You can edit the PHP script using Notepad. To do this, right-click on the file and choose ‘open with’ then from the list of installed applications on the PC choose ‘Notepad’
Step 8: Once the PHP file is open in Notepad, scroll down to the link which reads ‘$client > messages > create’.
Edit the reference to http://yourdomain.com/sms/ please note that your domain should appear within the “ “ (speech marks) so the final result should look something like this “http://myselfiemirrorwebsite.co.uk/sms/” Please note that the URL should end in a ‘/’ (forward slash) to indicate that it’s a directory.
Save over the PHP file in the ‘SMS’ folder on your PC.

Step 9: Once we have Twilio setup and the PHP script customized for your domain it’s now time to upload the PHP file and required scripts to your webserver.
There’s a number of ways to access your web server depending on your provider but the most common is via FTP.
Every host is different so this step is up to you or your website administrator to create you an account that can be used to access your server via FTP.
Download and install Filezilla, then connect using your FTP account details.

Once connected – navigate to the folder that holds your website – this is usually named something like ‘public_html’ ‘WWW’ ‘WWWroot’ or ‘htdocs’
Create a new directory in this folder called ‘SMS’ then upload the SMS PHP scripts to the ‘SMS’ directory on your web server.
Once the PHP files and folders have been upload – try to access the file ‘sms_client.php’ via your website domain – the address will be something like: ‘http://myselfiemirrorwebsite.co.uk/sms/sms_client.php’ please make note of this URL as we will need it to set up inside of Mirror Me Booth later.
If the file has been successfully uploaded you should get the error ‘wrong password’ displayed in your browser when navigating to this file

If you receive any other error that is PHP related, the most common cause of this will be that the PHP version on your server is less than 5.4. In this case – change the PHP version to 5.4 or above. (note that this can cause problems with other elements of your website is hosted on the same web server if they’re not compatible with later versions of PHP – this change is to be made at your own risk)
Step 10: We are now ready to configure the Foto Master Photo Booth software to communicate with Twilio. The first step inside the Foto Master Photo Booth software is to create a workflow that contains the MMS function. Remember that this should come after the image has been saved – a great place to put it is either before or after the printing state.

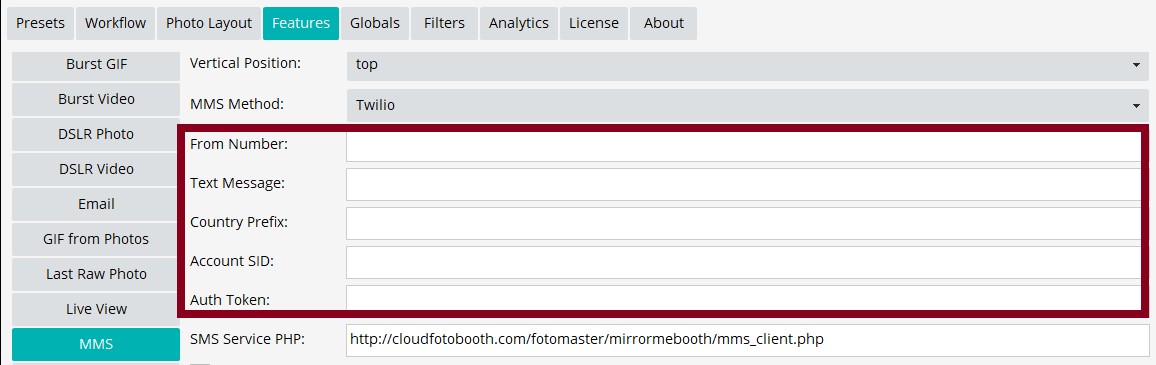
Step 11: Once we have added the state into the workflow – we can define the SMS settings from the features tab under MMS.
Enter your Twilio details in the Features
From number: Your Twilio number including country code.
Text Message: The message in the body of the SMS you would like to send.
Country Prefix: If inside the UK then +44 if outside then please use the country code you have defined inside Twilio.
Account SID: Your account SID from Twilio
Account Token: Your Account Token from Twilio
SMS Service PHP: The URL to the PHP file on your webserver
Step 12
Run through the workflow and test you receive an email when you enter your telephone number. Depending on your internet speed and the speed of the server, this could take up to 5 minutes – but usually much quicker.