Hi everyone!
When creating a custom file (Animations, Overlays, Thumbnails, etc.), there are two important guidelines we need to follow:
[Can't see the video? Click here to watch on YouTube]
- The file's name should not include spaces or special characters.
- The file should be located in the relevant Assets folder, inside a category folder (subfolder).
In this article, we will show you how to place a custom animation in the Animations folder:
1. Create your custom animations (you can use this article for further instructions).
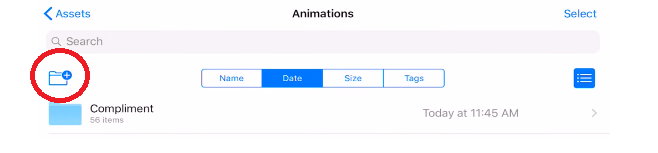
2. Go to: On My iPad > Foto Master Photo Booth > Assets > Animations > add a new folder:
3. Save your custom animations in the designated subfolder.
4. Open the iPad Booth software, and load it to your workflow.
Important:
- When adding a new asset, don't forget to create a new folder to place it inside the animations section or place it in an existing folder.
- The best way to add the new animation is to email it to yourself. When opening a file from the email app, you are able to save it directly to the files section (Caution, If you use a Mac and decide to Airdrop it, it will automatically save it to camera roll first. This can damage the animation and prevent it from loading in the workflow).
- Have a static PNG file you want to use instead of an animated one? No problem. The app supports .png images as well as animated ones. Simply copy your png files into the animation section.
Let's get this party started!